3 Step Guide to DIY Carpet Installation at Home
For the wise homeowner who wants to save money on labour costs and enjoy the satisfaction of doing a home renovation project themselves, the idea of installing carpet themselves can be intriguing. An effective DIY carpet installation may change a room by making it more comfortable and attractive. But it's also one of the harder DIY projects because it needs special tools, accuracy, and a lot of work. Before you make a decision, you need to understand all that goes into installing carpet.
This article will provide you with a realistic picture of the methods, tools, and abilities you need to know how to install carpet on your own. Are you ready to see if this project is right for your skills and tools before we go into the step-by-step process?
What are the Tools and Materials Required for DIY Carpet Installation
You need more than just a knee kicker and an ambition to install your own carpet the right way. You can't get a good result without the necessary professional-grade tools.
-
Essential Tools: Power stretcher, knee kicker, carpet knife (with hook blades), seam iron, stair tool, utility knife, chalk line, measuring tape, straight edge, and a strong staple hammer are all necessary tools.
-
Essential Materials: Carpet, carpet padding (which is a very important stage in putting down carpet), tackless strips, transition strips, and seaming tape are all necessary materials.
-
The Reality Check: You can rent a power stretcher and knee kicker, but it will take a lot of practice to use them correctly. If you don't have a power stretcher, your installation will probably seem unprofessional and have creases and buckles.
Step 1: Get the subfloor ready
A well-prepared flooring is the key to a successful DIY carpet installation. The new carpet will show any flaws.
-
Take Out the Old Flooring: Get rid of the old carpet, padding, and tackless strips completely. If you can't get rid of stubborn staples or nails, use a pry bar and hammer.
-
Check and fix: Sweep and vacuum the whole subfloor. Check the floor for squeaks and use screws to hold down any loose planks. Use a levelling compound to fill in any big cracks or holes.
-
Clean Thoroughly: The subfloor must be completely clean, dry, and free of trash. You will feel any residual grit underfoot, and it could hurt the new carpet backing.
You can now place the tackless strips and padding that will make your new carpet comfortable on a clean subfloor.
Step 2: How to Put Down Tackless Strips and Carpet Padding
At this point, you are building the base for your carpet. Properly laying carpet padding is important for how the carpet feels and how long it lasts.
-
Put in the tackless strips: Use a saw and hammer to put the tackless strips around the edge of the room. There should be a space of about ½ to ⅝ of an inch between the strip and the wall. Most importantly, don't put strips in front of doors.
-
How to Put Down Carpet Padding: Lay the carpet padding out so that it is perpendicular to the way you want to lay the carpet. Cut it such that it ends just within the tackless strips and doesn't cover them. Every 6 to 8 inches along the sides and seams, use staples to attach the cushioning to the wooden subfloor. Cut around vents and other things with a utility knife.
-
Seam the Padding: Line up the sides of the padding so they don't overlap. To keep the seams from moving, use a special tape to seal them.
The base is in place. Now comes the hardest part of putting in the carpet yourself: laying it, seaming it, and stretching it.
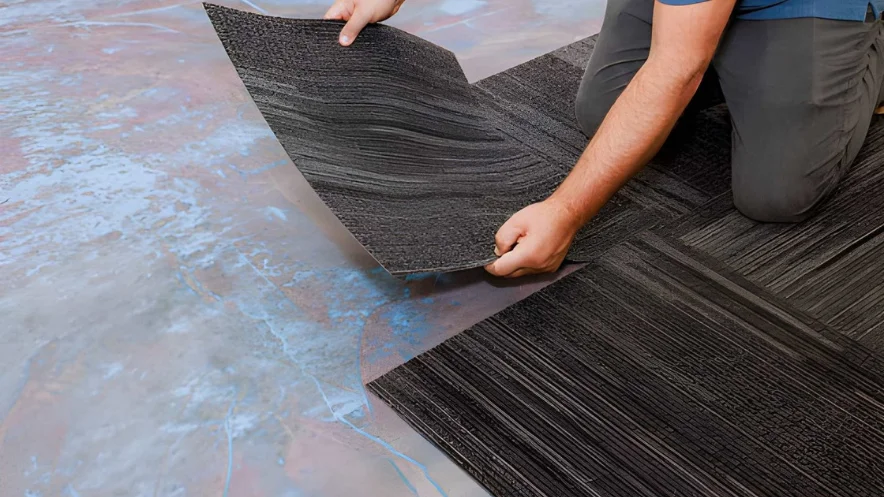
Step 3: The Main Event: How to Install Carpet
This is when you will need to use the rental gear and your patience. To install a carpet correctly yourself, you need to be very attentive with the measurements and the way you do it.
-
Lay and Cut the Carpet: Unroll the carpet so that it goes up the walls a few inches. If you need to sew a seam, make sure that the pile direction is the same for both pieces and that they overlap by a few inches. Use a straight edge and a sharp carpet knife to cut through both layers at the same time to get a perfect seam.
-
Make the Seam: Make it use seaming tape with the sticky side up under the sides that are connected. Use a seam iron to heat the tape, and then move it slowly and carefully. Press the two sides of the carpet into the tape as the glue melts. Use a carpet roller to make sure the connection is tight and can't be seen.
-
Stretch the carpet: This is the most crucial thing to do. Put the carpet on the tackless strips on one wall. Put the carpet on the strips and use the power stretcher to drag it towards the other wall. The knee kicker works well in tight places and corners. If you stretch in the appropriate manner, you can get rid of all the wrinkles and make things last longer.
When to Call in a Professional
Recognising DIY carpet installation also entails recognising when the job is too big for you to do alone.
-
Large or Complex Rooms: Rooms that are more than 12x15 feet or have more than one corner, bay window, or strange angle need sophisticated stretching and seaming skills.
-
Stairs: Carpeting stairs is a very difficult and risky DIY project that should be done by professionals.
-
Luxury Materials: If you bought high-end carpet, bad installation can void the warranty and harm the carpet.
-
Lack of tools: Not having the right tools or not being sure how to use a power stretcher will lead to bad results.
Frequently Asked Questions
You can save 50% or more on the entire cost of the project by not having to pay for labour. But you need to think about how much it will cost to hire professional-grade gear like a seam iron and power stretcher.
Seaming and power stretching are definitely the hardest parts. To be undetectable, seaming needs to be done with great care. To get the right tension without ruining the carpet, power stretching needs a lot of physical strength and skill.
It is strongly not recommended. A knee kicker by itself can't get the tension that wall-to-wall carpet needs. This will make the carpet loose and wrinkled, which will make it wear out faster and be a tripping hazard.
If you're doing it for the first time, it can take a whole day to do a little, simple rectangular room. A seam might easily take up a whole weekend in a bigger space. Experience cuts this time down a lot.
Laying down carpet padding is one of the easiest steps in the process. It means cutting it to the appropriate size, stapling it down tightly, and taping the edges. The most crucial thing is to make sure it doesn't cover the tackless strips.
Get the Perfect Finish with Help from Experts
If you have the right tools and are an experienced DIYer, DIY carpet installation may be a pleasant project. Hiring a professional is the best choice for everyone else because of how hard it is, how much work it takes, and how likely it is that you will make costly mistakes.
Are you ready for an installation that you can trust to be perfect? The experts at A&BCarpet have the tools, skills, and knowledge to make sure your new carpet is put fast and correctly, which will save you time and trouble. Contact us today to get an estimate and discover how much better your carpet will appear when it is properly laid.